

Architecture firms, civil engineers, and design-build contractors face the same dilemma on almost every pursuit. A bid is due, a feasibility decision is needed, or a budget has to be defended, and the site has not been surveyed. A licensed topographic survey costs three to fifteen thousand dollars and takes weeks to schedule. Most firms either skip the survey, work from county GIS and aerial imagery, or send someone out with a phone and a tape measure.
Each of those workarounds has a downside that shows up later. A bid that is too low because the cut-and-fill numbers were guessed. A design that does not fit the actual grade. A change order that wipes out the margin. The licensed-surveyor commitment makes sense for the design phase, but it is hard to justify at the pursuit stage.
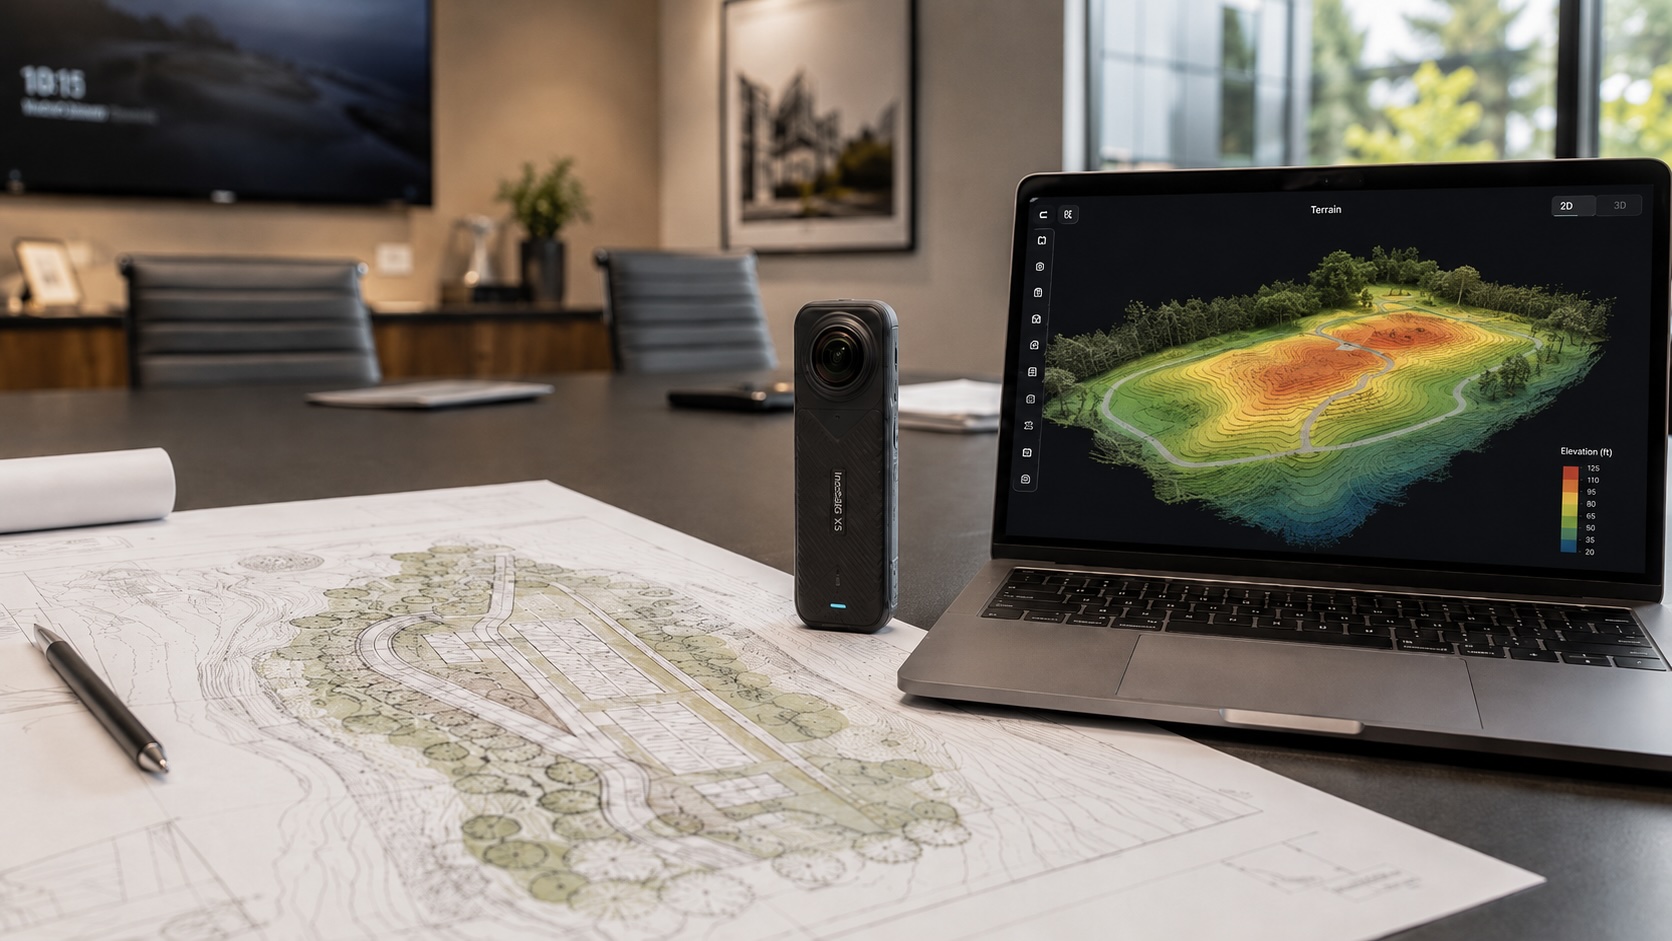
There is now a different option for the bidding and budgeting phase: a single 360° video walk with a consumer camera, processed by AI into an elevation heatmap, a 3D point cloud, and a navigable virtual tour. Real-world scale, in hours.
What is a topographic survey, and why every project needs one
A topographic survey is a three-dimensional measurement of a site's surface. It records ground elevation, slopes, contours, drainage patterns, vegetation, hardscape, existing buildings, and significant features like trees and utility lines. The output is usually a 2D contour map with elevation labels, but the survey itself captures the third dimension that 2D plans alone miss.
Architects, civil engineers, landscape architects, and contractors use topographic surveys to:
- Validate that a proposed building footprint fits the site grade
- Calculate cut and fill volumes for earthwork estimating
- Design site drainage and stormwater management
- Position retaining walls, parking, paths, and landscape features
- Confirm setbacks, easements, and existing improvements
Without an accurate topographic survey, design decisions are educated guesses. With one, the design rests on a measured baseline. The question is not whether to do a topographic survey. It is when in the project timeline to invest in which kind of survey.
Topographic survey cost: what a licensed surveyor charges and where the budget pressure comes from
A licensed topographic survey from a registered land surveyor typically costs:
- $3,000 to $7,000 for a small residential or light-commercial site (under one acre)
- $7,000 to $15,000 for typical commercial or multi-family parcels (one to five acres)
- $15,000 to $50,000+ for larger, more complex, or harder-to-access sites
The price reflects the work. A field crew runs total stations or GPS receivers across the site, post-processes the data in CAD, drafts the deliverable, and stamps it under the surveyor's professional liability and registration.
That cost is justified for final design and permitting. It is hard to justify at the bidding or feasibility phase, where the firm has not won the project, the client has not committed to design fees, the site might be one of several being evaluated, and the bid timeline is shorter than the surveyor's schedule. So firms skip the survey at this stage and bid on county GIS contours, Google Earth elevation guesses, and a drive-by visit. Some of those guesses are right. The wrong ones cost the firm a change order or a profitable bid.
How long does a topographic survey take, and why bid timelines force shortcuts
A licensed topographic survey typically takes two to six weeks from contract to deliverable, depending on:
- The surveyor's schedule and backlog (often the longest variable)
- Site size, terrain, and access conditions
- Weather and seasonal vegetation
- Coordination with property owners or tenants
- Post-processing and drafting time
A bid timeline is often shorter than two weeks. A feasibility decision can be shorter still. That timing mismatch is why "skip the survey for now" becomes the default at the pursuit stage, and why design decisions rest on assumptions that may or may not hold when the licensed survey finally lands.
How to do a fast topographic survey with a 360° camera and CupixVista
CupixVista uses a consumer 360° camera and a smartphone to capture a site comprehensively in one continuous walk. AI processing turns the video into a 3D point cloud, a color-coded elevation heatmap, a navigable 360° virtual tour, and a 3D dollhouse map. Real-world scale is recovered from the camera's IMU (Inertial Measurement Unit) and the phone's GPS, so the output is to scale without a separate RTK receiver.
Equipment
Bring:
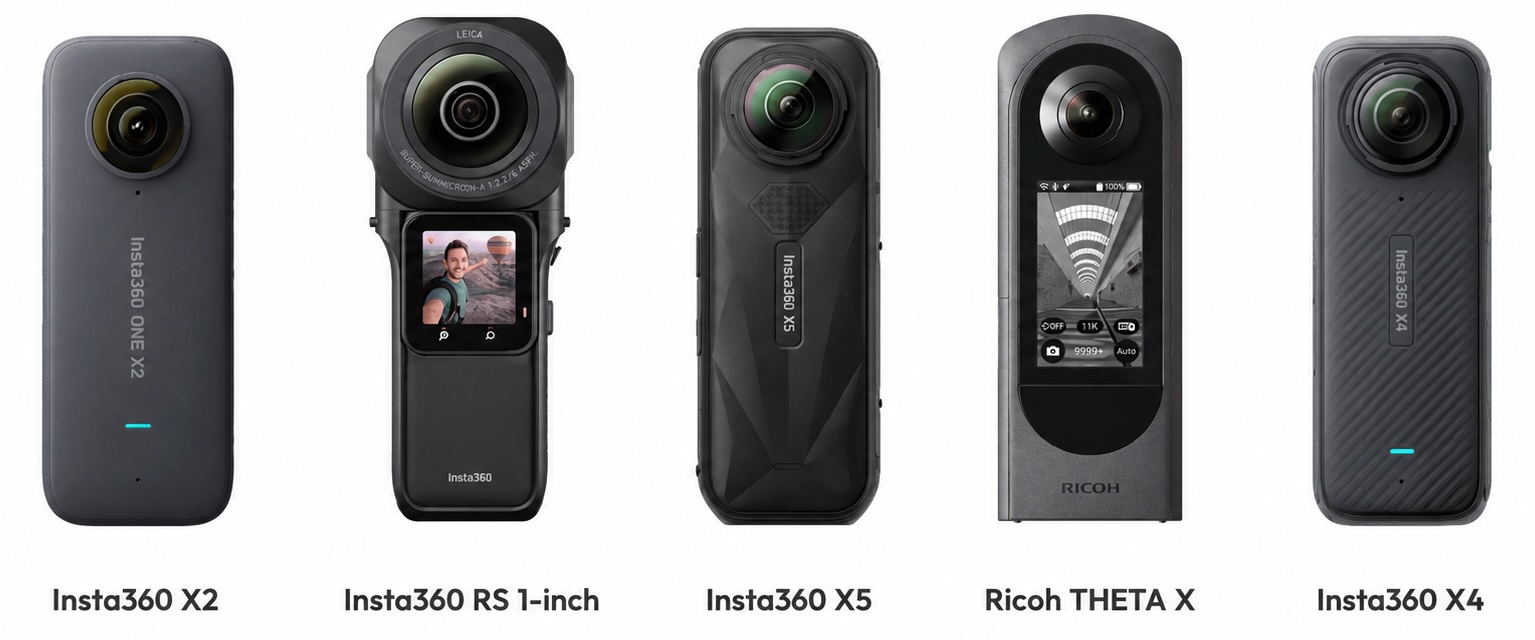
- A supported 360° camera: Insta360 X5, Insta360 X4, Insta360 ONE X2, Insta360 ONE RS 1-Inch 360 Edition, or Ricoh THETA X
- A smartphone running the VistaCapture app
- Optionally a 10-foot pole like the Insta360 Extended Edition Selfie Stick for vantage over vegetation, fences, and grade changes
No survey crew, no RTK receiver, no laser scanner.
Video walk
Walk the site at a steady pace. The 360° camera records every direction at once, so the operator does not aim. A single continuous walk can cover up to 60,000 square feet at site speed. For an accurate topographic capture, the practical rules:
- Walk a continuous path, not stop-and-go
- Cover the perimeter and the interior, including any abrupt grade changes
- Hold the camera high or mount it on a pole when grass, brush, or fences would block the lower views
- Use OmniNote to take voice notes for elevation references and feature callouts, automatically transcribed and geo-tagged to the right point in the 3D model
CupixVista's per-pixel depth recovery reaches up to 10 meters outdoors, double the ~5-meter ceiling of iPhone LiDAR. That means a single walk can cover larger and more open sites than smartphone LiDAR apps can manage without stitching multiple short scans.
AI processing
Upload the video through the VistaCapture app. AI processing typically completes in two to three hours and produces a complete output set from one capture.
CupixVista delivers up to 99% schematic dimensional accuracy on the resulting 3D map. Schematic accuracy is the right standard for design decisions and budgeting. It is not a substitute for survey-grade tolerances on stamped engineering documents.
What you get from one walk
A bid team or feasibility group can pull all of this from a single capture:
- Color-coded elevation heatmap of the site's grade
- 3D point cloud, exportable in PLY, XYZ, and E57
- Navigable 360° virtual tour
- 3D dollhouse map and orthographic site view
- Measurable distances, areas, and volumes
- Geo-tagged high-resolution detail photos and transcribed voice notes
- One-click point cloud import into Autodesk Revit through the CupixVista plugin
Bringing the capture into your design tools
The CupixVista capture is the spatial foundation. The next step is to bring the point cloud and the elevation heatmap into the design tools your team already uses. The outputs fit cleanly into the most common AEC topographic workflows.
Autodesk Civil 3D: TIN surfaces, contours, profiles, and earthwork
Civil engineers and site planners typically run topographic data through Autodesk Civil 3D. The workflow:
- Export the point cloud from CupixVista in PLY, XYZ, or E57 format.
- Process the point cloud in Autodesk ReCap Pro to convert it into RCS or RCP, the formats Civil 3D reads natively. ReCap accepts PLY, XYZ, and E57 as input.
- Attach the point cloud in Civil 3D with the POINTCLOUDATTACH command. Confirm coordinate system and units before continuing.
- In the Toolspace Prospector, right-click Surfaces, choose Create Surface, select TIN surface, and add the points as a definition source.
- Generate contour lines at the interval the project needs, typically half-meter or one-foot for site design.
Once the TIN surface exists, the full Civil 3D toolset is available:
- Generate alignment profiles along proposed roads, drives, or grading lines
- Draw cross-sections at any station for grading and earthwork review
- Run cut-and-fill volume analysis by creating a volume surface that compares the existing-ground TIN (from the CupixVista capture) against the proposed finished-ground TIN
- Build corridors and feature lines for road, parking, and stormwater design
- Export contours, surfaces, or LandXML for handoff to consultants
The cut-and-fill numbers from a Civil 3D volume surface comparison are accurate enough to defend in a bid context. Civil 3D overlays the two TIN surfaces, computes the polyhedron difference, and reports cut, fill, and net volumes per region.
Autodesk Revit: point cloud reference and toposolid creation
Architects use the one-click CupixVista Revit plugin to import the point cloud directly into Autodesk Revit. CupixVista exports point clouds in PLY format, and the plugin handles the PLY-to-Revit import in one step without going through a separate conversion utility. Once the cloud is loaded in the Revit project, it serves two roles.
First, it is a coordination reference. The point cloud is visible in plan, section, and 3D views. The design team measures from it, aligns walls and footprints against it, and verifies the design against actual site conditions without leaving Revit.
Second, it is the source material for a topographic surface. Revit 2026 introduced improved toposolid handling, with raised point-count limits and better grading-region support. To go from the loaded point cloud to a Revit-native toposolid, third-party plugins such as PointSense for Revit convert the loaded points into a toposolid that integrates with building elements, sloped sites, grading regions, and cut geometry. The CupixVista Revit plugin is the entry point. The third-party toposolid tools take it the rest of the way for teams that need a fully native Revit terrain object.
The same point cloud stays available as a verification reference throughout the design process, even if no toposolid is generated.
Rhino, RhinoTerrain, and Lands Design: landscape architecture workflows
Landscape architects often work in Rhino. The CupixVista point cloud imports into Rhino through RhinoTerrain which computes TIN terrain meshes from large point clouds. From there the standard landscape design workflow runs: planting plans, paths, grading, cut and fill, and area and volume calculations. RhinoLands extends the workflow further with parametric grading tools, cuts, fills, paths, and holes built directly on the imported terrain.
SketchUp: terrain reference via Scan Essentials
SketchUp does not handle point clouds natively. The Scan Essentials extension, available with a SketchUp Studio subscription, imports the cloud and converts it into a usable terrain surface. The output is less precise than the Civil 3D or Rhino path, but the workflow fits firms that already standardize on SketchUp for early-stage massing and visualization.
Bentley OpenRoads, OpenSite, and other civil platforms
Civil 3D is the most common destination, but Bentley OpenRoads Designer, Bentley OpenSite Designer, Trimble Business Center, and other civil platforms accept point cloud and LandXML inputs. CupixVista exports in widely supported formats (PLY, XYZ, E57), so the capture is portable across the AEC tool stack rather than locked to a single vendor.
Picking the right tool for the deliverable
The short version, by deliverable:
- Cut-and-fill volumes, alignment profiles, grading design, drainage: Civil 3D or Bentley OpenSite.
- Building-mass coordination, design review, schematic site plan: Revit (with toposolid) or SketchUp.
- Landscape planting, paths, grading, parametric site design: Rhino with RhinoTerrain or Lands Design.
- Contour exhibits, 2D site plans for permits or bid sets: AutoCAD Map 3D or Civil 3D contour outputs exported to DWG or PDF.
The CupixVista capture feeds all of these. One walk, one upload, then the point cloud goes wherever the deliverable lives.
Where a 360° camera survey fits and where you still need a licensed surveyor
CupixVista is not a substitute for a licensed surveyor when the project requires:
- Stamped survey documentation for permits, recordation, or financing
- Property line, boundary, or easement determination
- Survey-grade tolerances (millimeter or sub-centimeter) for structural design
- FEMA flood elevation certificates
- ALTA/NSPS land title surveys
- Subdivision plats or any deliverable that requires a registered professional's seal
It is the right tool when the project requires:
- Site information fast enough to inform a bid or a budget
- Schematic-accurate topography for early design decisions
- Visual context any stakeholder can open without specialist software
- A site record that carries forward into the as-built phase after the bid is won
The professional's judgment determines when the output is sufficient. This post does not make that call. Treat the 360° camera capture as the bid-stage and feasibility-stage tool, and the licensed survey as the design-and-record-of-truth tool. They solve different problems at different points in the project timeline.
From bid foundation to as-built record
The economics improve when the bid-stage capture carries forward into the project. The same 360° walk that supported the proposal becomes the as-built foundation if the firm wins. There are two paths from the point cloud to a finished as-built drawing:
- Path A: import the point cloud into Revit through the one-click CupixVista plugin and model the as-built in-house
- Path B: hand the point cloud to a Cupix scan to BIM service partner, such as Transform Engine, HiTech Digital, or scantobim.online, for finished drawings and BIM assets
No second capture, no second walkthrough. The bid-stage investment amortizes across the full project lifecycle.
For a deeper look at how the 360° video SLAM workflow compares with iPhone LiDAR apps and photogrammetry across the full as-built workflow, see the companion post on choosing a 3D scanning method for an as-built site survey.
Sharing the survey with the bid team and the client
The project lives in a shared workspace, not as a file emailed around. The estimator, the structural consultant, the landscape architect, and the client can all log in to:
- Walk the 360° virtual tour from a browser
- Pull measurements anchored to the 3D model
- Drop annotations with file attachments
- Load shareable team bookmarks at exact 3D viewpoints
- View the same elevation heatmap and dollhouse map
Access controls run per project. A subcontractor can be given view-only access to a single bookmark. A client can be given full project access. A consultant can be removed when their scope ends. The record stays with the firm.
Conclusion
The cost of preliminary site information is changing. A consumer 360° camera, a single site walk, and a few hours of AI processing produce a topographic baseline at a fraction of the licensed-surveyor cost, fast enough to inform a bid or a feasibility decision. The licensed surveyor still has the role when the project requires it. The question is which method belongs at which stage of the work.
Ready to see it work? Get started with CupixVista, or browse answers to common questions.
Frequently asked questions
What is a topographic survey?
A topographic survey is a three-dimensional measurement of a site's surface, recording ground elevation, slopes, contours, drainage patterns, vegetation, existing buildings, and significant features. The output is usually a 2D contour map with elevation labels, but the underlying capture is a 3D record. Architects, civil engineers, landscape architects, and contractors use topographic surveys to design buildings and site work that fit the site's actual conditions.
How much does a topographic survey cost?
A licensed topographic survey from a registered land surveyor typically costs $3,000 to $7,000 for a small residential or light-commercial site, $7,000 to $15,000 for typical commercial and multi-family parcels, and $15,000 to $50,000 or more for larger, more complex, or harder-to-access sites. The cost covers a field crew, professional equipment, post-processing, drafting, and the surveyor's seal. A 360° camera-based capture with CupixVista costs a fraction of that and is suitable for the bidding, budgeting, and feasibility phases.
How long does a topographic survey take?
A licensed topographic survey typically takes two to six weeks from contract to deliverable, depending on the surveyor's schedule, site size, terrain, weather, and post-processing time. A CupixVista capture takes a single continuous site walk at site speed, followed by two to three hours of AI processing. The two methods solve different problems: the licensed survey is the documentation of record for design and permitting, while the 360° camera capture is the spatial baseline for early decisions.
Do I still need a licensed surveyor after a 360° camera capture?
For final design, permitting, property-line determination, ALTA/NSPS surveys, and any stamped engineering document, yes. A licensed surveyor's seal is required by law and by contract for those deliverables. A 360° camera survey is the right tool for the bidding, feasibility, and budgeting phases, and as a comprehensive site record that the licensed survey can later be coordinated against. The two methods are complementary, not interchangeable.